Chorus: why it starts with a delay that will not sit still
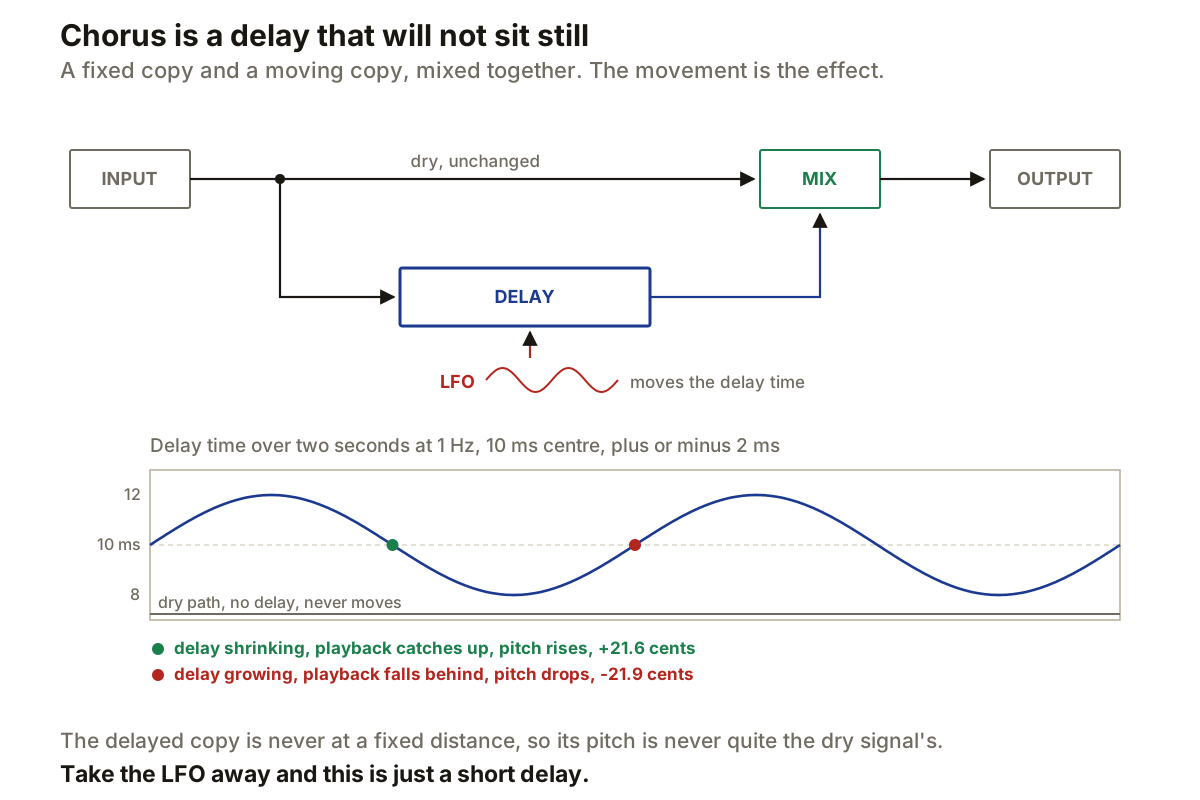
A chorus begins with a delay line, and the whole effect comes from the fact that the delay time never stays put. An LFO moves it, and the moving copy is mixed back with the original.
That is worth separating from the thing it resembles. Duplicating a track and nudging the copy 10 ms later gives you a fixed relationship: every event stays 10 ms behind, forever. Set an LFO moving that delay between 8 and 12 ms instead and the copy is continually being pulled toward the original and pushed away from it.
Moving a delay changes pitch
This is the part that surprises people, and it follows from the movement rather than being added separately.
Think of a tape loop. If the playback head catches up with material already recorded, it moves through that material faster and the pitch rises. If it falls further behind, playback effectively slows and the pitch falls. A modulated digital delay does the same thing without the tape.
So a shrinking delay plays sharp and a growing delay plays flat, and the amount depends on how fast the delay is moving rather than how far it has moved. In the diagram above, 2 ms of depth at 1 Hz gives about 21.6 cents sharp at the steepest fall and 21.9 cents flat at the steepest rise. Apple describes exactly this as the point: the LFO-generated variations imitate the small pitch and timing differences you get when several people play together.
Rate is the cycle speed in hertz, which is cycles per second, so:
0.5 Hz  ->  1 / 0.5 = 2 seconds per cycle
2 Hz    ->  1 / 2   = 0.5 seconds per cycle
Depth, which Ableton calls Amount, sets how far the delay time moves around its centre. More movement means a larger pitch excursion, because the delay is travelling further in the same time.
The dry signal is not optional
Here is the cleanest proof that the dry path is what makes this chorus rather than something else.
Ableton’s Chorus-Ensemble has three modes: Chorus, Ensemble and Vibrato. Vibrato is the same modulated delay with the dry signal taken away, and it is called vibrato because that is what a pitch-modulated signal on its own sounds like.
Add the unmodulated original back beside it and you get chorus. The effect lives in the changing relationship between a fixed reference and a moving copy, not in the moving copy itself.
That relationship is also frequency-dependent. At any instant the delayed copy sits at a different phase relative to the dry signal at every frequency, so some frequencies reinforce and others cancel, exactly as in comb filtering. As the delay time moves, those peaks and notches slide up and down the spectrum. That sliding is a large part of what people hear as the chorus “shimmer”.
Which is why chorus and flanging are the same machine
Both are a dry signal plus a modulated delayed copy. What separates them is the settings, chiefly delay time and feedback.
Ableton documents Feedback as returning each channel’s output to its own input, and notes that increasing it sounds more extreme and tends to emphasise upper harmonics. Shorter delays with more feedback produce the resonant sweep people call flanging. Longer delays with little or no feedback produce thickening.
More than one moving copy
Ableton’s Chorus mode adds two time-modulated delayed signals to the input, and Ensemble mode adds a third, modelled on a three-delay-line pedal from the seventies.
Multiple voices matter because of what happens if they all move together. Identical modulation on every delay makes every copy speed up and slow down in unison, which produces a stronger version of one effect rather than a richer one. Offset the LFO phases and one voice can be shortening while another is lengthening. For three voices spread evenly around the cycle:
360 / 3 = 120 degrees apart
Stereo chorus distributes those moving voices differently between left and right, which creates channel differences without panning the dry signal anywhere. That is worth checking in mono, because the copies still interact when the channels are summed.
Keeping the low end out of it
A moving delay makes the bottom of a sound wander, which is rarely wanted.
Ableton documents a high-pass filter on one of its chorus delays for exactly this, letting low frequencies out of the delayed signal. UVI’s Thorus XT uses a crossover instead: everything below the cutoff bypasses the modulation and is mixed back through its own gain control.
Either way the point is the same. The fix is not to EQ the whole source, it is to keep the low band out of the moving path while everything above it is modulated.
Producer’s note
Set chorus by deciding what you want moving, not by turning Mix up until it sounds like something.
Delay sets the basic distance from the dry signal. Rate sets how often that distance changes. Depth sets how far it changes, and therefore how much pitch movement you get. Mix decides how much of the moving copy meets the fixed reference. Feedback decides how much of the result goes round again.
If the pitch motion is the thing you want, listen to the wet path alone and stop expecting more dry signal to help. If the low end has gone unstable, filter the modulated path rather than the source. And if it sounds like vibrato, that is the diagnosis: not enough dry signal is reaching the mix.